Converting 6 volts to 12 volts.
In this article I’m going to talk about what it takes to convert your car from the old 6 volts to 12 volts. First thing to decide is if you even want to convert? There are major pluses to the 12 volt, but if you’re going for that all stock vibe then I would leave it 6 volts. I own and have driven the 6 volt cars and there is a certain “feel” you get. Example; one of my cars used to be a 1960 KG. All OE. In the winter time I would leave work and it was dark outside so I turn on the headlights. You find when you rev up the motor the lights get brighter. It’s winter so of course it’s raining outside, so now you have the lights are on and the wipers. The cool thing here is you kind of get two speeds- slow and at idle, slower. People looking at you at a stop sign think you’re rocking out, but in reality your head is just following the wiper blade. Then you take off and things get better. You slow down to make your turn and now the brake lights are on as well. You hit the turn signal and guess what? There is not enough juice left to make the flasher work. Oh and this doesn’t count the fact that you’re listening to yourself sing because there just isn’t any AM stations worth a damn on your OE stereo.
.jpg)
So this is why converting to 12 volts is nice, but you have to weigh out the cost of what it’s going to take. In this I will list what you have to have, and what you can get away with for a while. You might want to go through the list and start collecting parts if you’re thinking about switching.
What you’ll need:
12v battery
Negative battery strap
Starter
Flywheel
Coil
Choke
Idle cut off
Generator or Alternator
Generator/Alternator stand
Gen/Alt strap
12v Gen/Alt pulley
3pc tin behind Gen/alt
Bulbs, brake/tail, turn signal, Lic plate, parking, dash lights, headlights, dome light
Turn signal relay/emergency flasher relay
Headlight relay
Wiper motor
Gas gauge
Ok so let’s take this one by one.
The 12v battery will be bigger than the 6v in most cases. This is not a problem if you get one that was made for a VW. Your 6v cover will not fit and the strap that held it down usually wont work. You can modify the strap or make a spacer so that the strap will hold it down. Another way is get a plastic box bolt it to the floor and then put the battery in the box. The big thing here is have a cover over the positive side of the battery or the whole top of the battery. Here’s why. When your cousin Tony gets in the back seat over the battery and the seat springs touch the post he is going to get a hot seat, and the battery can explode. Been there done that, got the t-shirt to prove it. Please strap the battery down. If you get in an accident and the battery flies around it will short out. Those of you with buses, even if you don’t get in an accident you are going to ruin your tail light bucket on that side because the battery will slide into it. Just take the time and get it secure.
.jpg)
As long as your negative battery strap reaches the post your good. A lot of times that strap is too short and you will just need a longer one. While you have it off, clean the area where it bolts to the body and use some dielectric grease here. That just insures no ground problems.
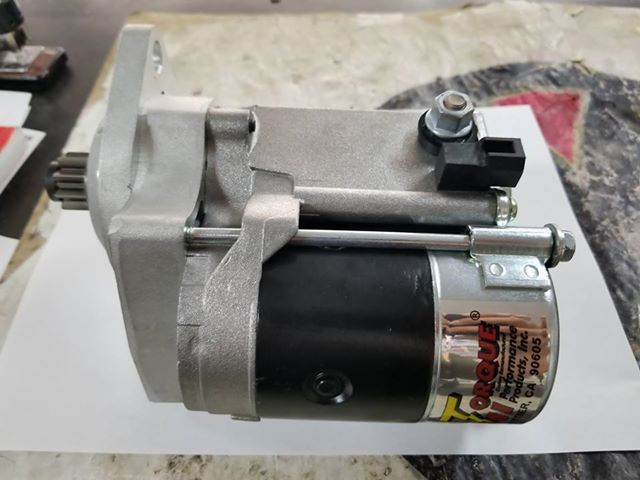
The starter is an area you can cheat. You can leave it 6v and leave the flywheel 6v. What is going to happen here is the starter will spin twice as fast. Sounds good right? Not really. What happens here is the gear spins so fast that sometimes it wont engage. This chews the shit out of the flywheel and needless to say is hard on the starter motor itself. You can't just change out the starter, you have to have a flywheel to go with it. There is however one trick that I have used. I buy a 12 high torque starter that has a removable gear. You can buy from the same place a 6v gear that will go on that starter. Pretty cool. So now your starter is 12v but the gears match and you don’t have to mess with the flywheel. Better yet, it is self supporting and doesn’t need a starter bushing. Hell, you don’t even need to take the engine out!

The flywheel is tricky. When changing a flywheel there is way more to it than just taking the old one off and putting a new one on. First, there are two types of mating surfaces. What we call a stepped flywheel (most 6v) and an o-ring flywheel. The o-ring flywheel will not fit right on a crank made for a stepped flywheel. You can take it to a machine shop and put a step in the flywheel or you can send your old flywheel to someone who has 12v ring gears and have your old flywheel turned down to accept a ring gear. Personally, it's way cheaper to do what I said with the starter above. The other thing is, you have to check your endplay and if it’s not right you will need to reshim it so it is. I’m not going to get into that in this article, but know this has to be done.
The coil is pretty straight forward. All I can say is please buy a 12 bosch blue coil. Don’t put a napa American coil on it. The real bosch coils are worth the money and are way better than that black American coil. Make sure you pay attention to where the wires go. Number 15 is the positive side and number 1 is the negative side. There should only be one wire on the negative side that goes to your distributor. The only exception here is if you have a tach.
The choke is an area you can cheat or sometimes have to cheat. I will explain. The 12v chokes for the carbs are all one size. The 6v chokes came in two sizes. Smaller than the 12v or the same size. So here are your choices. If you have the one that is smaller well you will no longer have a choke. Take the wire off at the choke and the coil. Now take the air cleaner off and loosen the three screws that hold the choke to the carb. Hold the accelerator arm open and rotate the choke clockwise until the choke flap is wide open. Then tighten the three screws back up. If you’re replacing the choke, pay attention to the hook on the choke and the arm that the hook catches in the carb. Place the choke element in the carb and then rotate counter clockwise until the choke flap just closes, again with the accelerator arm pulled down. After you’re done converting the whole car you will need to fire up the motor and let it warm up, making sure after the motor is warm that the choke is coming all the way off. In other words, that the flap is straight up and down. If it’s not then just loosen the screws and twist clockwise until it is. This, by the way, hooks up to the positive side of the coil.
If your carb has an electric idle cut off (most early carbs don’t) you can do two things here. Try and find a 12v one or what I do is just take it out, find the number on the side (that’s your jet size), and replace with an idle jet of the same size that is not a cut off jet. Make sure you take the wire off the coil. As a general rule here the choke and the idle cut off here was one wire. So if you’re running the electric choke then make a new wire without the chain for the idle cut off. If you’re not going to run a choke then take the chained wire off all together.
There are two ways to go with the generator/alternator. If you get a new alternator, most of the time the regulator is built into the alternator, so wiring is a piece of cake. The wiring goes: The two big red wires go to the threaded post and the blue wire to the push on post. One thing to keep in mind when using an alternator is that your idiot light on the dash has to work for the alternator to charge. If you have a non-working light,your alternator will not charge, period. If you are going with a generator then you will have to buy a regulator and find a place to mount it. Please don’t mount it to the fan shroud with self tapping screws. They will come loose and the regulator will fall down, causing a direct short and will possibly catch you car on fire. So find a better place to put it and use bolts and nuts. You will have to do a little wiring. The wiring goes:The two big red wires will go to the B+. The blue wire goes to the number 61. On the other side of the regulator, just match up the symbols to your generator. Colors and wire size should be 8 to 10 gauge red for the D+ and 12 to 14 gauge for the DF if you’re running a ground 12 gauge brown for the D-.
Regarding generator/alternator stands, the 12v stand is larger on all but a 1966 bus. If you have a 1966 bus with a 6v remote regulator you can skip this as well as the pulley, strap, and tin. For the rest of you, read on. Here is what you need to know about 12v stands. There are two types. A generator stand and an alternator sand. You can put a generator on an alternator stand but you can NOT put an alternator on a generator stand. So when you’re buying a stand, new or used, you have to know what you’re getting. This is an easy install. Just take your old one off, throw it in the neighbors yard, and install the new one. Those of you with type 3 pancake motors you have to change out the fan shroud. No such thing as new ones, so you will be on the hunt.
Now the strap. The 12v strap is just larger in diameter then the 6 volts strap. That’s it. Make sure before you put the belt on that you give the pulley a spin to make sure the fan isn’t rubbing, then tighten the strap. Give it another spin after the strap it tight again to check for rubbing of the fan to the tin. Those of you with the type 3 the strap is bigger as well.
The 6v pulley will fit the 12v generator or alternator but the offset is wrong. So you have to buy a 12v one. Type 3 guys, no worries as you can slide the generator back so the belt lines up.
How about the tin? Type 3s can skip this as there is no tin or fan. This tin is different than the 6v tin and no, your 6v tin wont work. The way it goes on is the flattest plate goes on first. If it has a hole in the face, that hole goes down. Place it over the two studs of the gen/alt then the small ring. Now the rear most plate. Look at it closely you will see and area on the edge of it that’s open. That again faces down. I use nylock nuts here as I don’t want these nuts backing off. You then just reinstall your fan hub and fan off your 6v generator. Before installing make sure your fan is not rubbing the tin. If it is, you might have to shim it with pulley shims. The fan nut torques so 40 ft lbs. You can reach around the back and use your torque wrench to tighten after you have it installed and the belt on. Don’t forget and don’t use an impact.
The bulbs are easy. Just count how many you have and buy the appropriate number to switch. You can leave the 6v ones in if you like and what you will notice is they will be really bright for about 3 seconds before they burn out. There’s no trick here, just remove and replace.
Trust me, the 6v turn signal/emergency relay will not work. On most of the 6v cars you can just get a three prong relay. This is for cars that do not have an emergency flasher. If you get a good german relay with the correct number it wires like this- 49 goes to the fuse box, 49a goes to the idiot light and the turn signal switch, 31 is ground, use brown wire. If your car has an emergency switch then you will have to spend the money and get the correct 12v one. On some early buses, they had a separate emergency flasher relay as well as the 3 prong relay. You can replace the 3 prong relay and there is no fix or part for the stand alone relay. I have found that when I just leave it hooked up the turn signals work fine. I have never turned on the emergency flasher to find out if the remote box will work or not. I am afraid of smoking the unit. Whenever you’re doing wiring, pay attention to the colors and numbers. The number system is the same 6v to 12v. One of the hardest things to do is get the smoke back in the box once you let it out. So go slow and no drinking.
If your dimmer is on the turn signal switch and not on the floor then you have a headlight relay and you will have to change it to a 12v one. Here lies the problem. The old one is a four prong and the new one is a five prong. The fifth prong has to be hooked up or it will not work. The fix? Use a piggy back connector and jump the (56) to the (30). I use a red 14 gauge wire. The number (56) becomes hot when you turn the headlight switch on. By having that jumper, it will also power the (30) making it work. Keep in mind here the (s-) is a brown wire with a white strip that goes into the turn switch. Whatever you do, don’t hook that up to any other terminal.
The wiper motor is a biggy. There are a few ways to convert. If you’re rich, you can go find a 1967 only bug motor and install it in your bug. If you have a bus, then with some mods you can get it to work on that too. The nice thing about that motor is it has two speeds. The fast mode is nice and is way faster than the 6v by far. If you have a bug then and you’re getting a 67 bug motor then get a new switch too as it has both speeds on it. If you can't afford a new switch because you spent all you money on the motor then you can pick what speed you want when you turn it on. The only drawback is the “park” might be in a different spot than your old one. You can do two things here- Figure out the park cam inside the motor and get to park where you want it, or you can take off the wires for the “park” system and just have the speed wire. What happens here is when you shut off your wipers it stops where you shut the switch off. The other cheaper thing you can do is install a 12v armature in your motor. Much cheaper and easier way to go, however it doesn’t fit all motors and you will only have one speed. You can leave it 6v and have mach 5 wipers. This really doesn’t work at all. You can try volt drops but you might as well save the money to buy more beer, they are waste of time and money. Rain-X is another option, make sure to keep some in the car for touch-ups though.
Most early cars have no gas gauge or have a mechanical one. So nothing to do there. Those of you with electrical gauges just use them. Don’t ask me why, because I don’t have reason, but the 6v gauges work and don’t burn out. I have been using them for years on 12v and they work, so no money spent there.
So there you have it. That is what it takes to convert over to 12 volts. Is it worth it? To most it will be, especially on daily drivers, unless you really want to keep the car original. I have a few all OE cars and I love them, so I get it. The other cool thing about 6v cars is they always make for great stories.


