Swing time.
In this article we will be talking about how to remove and install swing axle tubes and axles. You IRS, (independent rear suspension) guys can skip this one or just read on for the knowledge.
I'm going to assume you know how to get the transmission out. Once out, it's really nice to have an engine stand to work with. You don’t have to, but I’m telling you it's worth it. You’ll see why later. Start by mounting your transmission in your stand so that the axles are left to right. Have at least two or three oil drain pans. Drain the oil out of the center section. You will need a 17mm allen. An oak tree mechanic trick is if you don’t have one use a 17mm headed bolt and a pair of vise grips. Not recommend but in a pinch that does work. If you are working on a bus with reduction boxes pull the drain plugs out of the reduction boxes and let drain.
Non reduction box tear down.
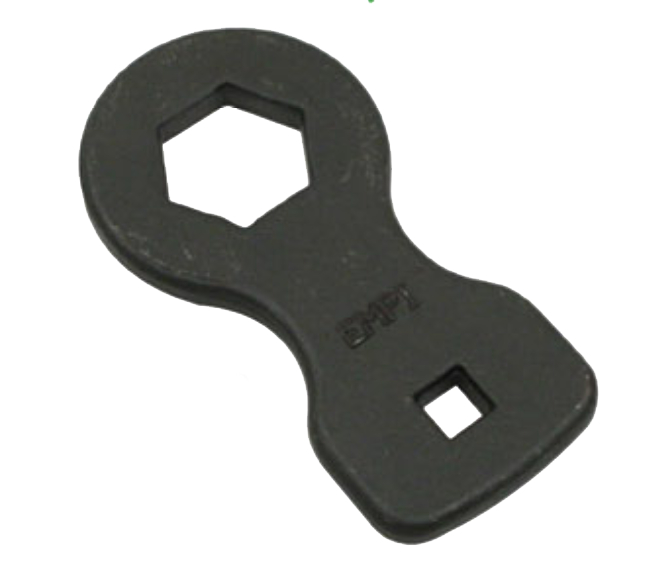
If you have drum still on it then get out the impact wrench and a 36mm socket and remove the axle nut. If the impact won’t take it off you can buy a pork chop tool.

The way you use this tool is put it over the nut and use a BFH (big ***** hammer) on it. If the drum doesn’t slide off you might have to back off the brake shoes. Once the drum is off, remove the four bolts that hold on the bearing cap. Remove the bearing cap and the backing plate. Have your drain pan under this area as it’s going leak. Now remove the large spacer that’s up against the bearing. You will also see a small o-ring and a shim (looks like a washer) up against the bearing. By removing them it will make your life easier to pull the tubes off. At this point we will move into the center section area. You will see 6 nuts holding a retainer of the axle tube onto the side plate. Remove all 6 nuts and the wave washer that are under them. To remove the tube I use a puller. It threads into two of the four bearing bolt holes then presses down on the axle. If you can rig something up to do that, great, if not there is the oak tree mechanic way. Use a dead blow hammer (not a steel hammer), hold the axle tube out straight and hit the back side of the casting where the spring plate mounted. If you hit just under where the shock mount is then you have less of a chance to bend the casting. Once the tube is off take a piece of pipe that slides down the axle tube and knock out the bearing and with that will come out the small spacer. With your fingers just unsnap the plastic flower looking piece that is on the side plate that the axle tube pivoted on.
Now for the axle. You will need a large pair of circlip pliers. You can try needle nose pliers, but I hope there not your favorite ones because you will break them. Just go get a big set of the correct pliers. Remove the circlip and under that is a thrust washer. Take that out. Now grab the axle and pull it out. Now, with your fingers, remove the two fulcrum plates. You can try and take out the side gear at this point but most of the time it won’t come out due to a ridge that has mushroomed out from the circlip. At some point you will want to grind or file that ridge out so you can get the side gear out. Now that you have made a mess on the floor by kicking the oil pan, you can do the same thing on the other side.
Reduction box tear down
If you have reduction boxes this process takes a lot longer. Start with the drum. Get out your impact and use either a 36mm socket or a 46mm socket. If the impact won’t take it off, you can buy the pork chop tool pictured and described above. Once the drum is off, remove the bolt that holds the wheel cylinder on. There will be two nuts under the brake adjusting stars, remove those. Now remove the four bolts that hold on the bearing cap. Remove the bearing cap and the backing plate. You should have your drain pan under this area already from draining the box. Now remove the large spacer that’s up against the bearing if it did not come out with the cap. You will also see a small o-ring and a shim (looks like a washer) on the 36mm nut boxes up against the bearing. Remove all the bolts that hold the reduction box together. The boxes are pinned together so you will need a hammer and a punch. You can drive off the outer half by using your punch in the area of the drain and fill plugs. Once you get it started to come apart you can use some pry bars and gently pry the outer half off. Be careful not to gouge the sealing surface of the box. Once the outer half is off you will see a snap ring on the upper axle that holds the upper outer bearing on. Use your snap ring pliers to remove that snap ring. With two large screwdrivers, pry under the upper gear. The gear and bearing will come off. If you have early (36mm) boxes you can now just pull on the lower stub axle. If you have the late boxes (46mm) you will need to remove the soft plug on the back side of the box. You do not have to remove the lower axle to get the tube off. If you want to get that stub out then what I do is tack weld a nut on the soft plug and use a slide hammer to pull it out. Then I grind off the tack weld and I can reuse the plug. You will find a crimp nut on the back side which takes a 41mm socket. .
At this point we will move into the center section area. You will see 6 nuts holding a retainer of the axle tube onto the side plate. Remove all 6 nuts and the wave washers that are under them. To remove the tube, use your dead blow hammer and hold the axle out straight and hit the back side of the reduction box, driving the tube off the axle. With your fingers, unsnap the plastic flower looking piece that is on the side plate that the axle tube pivoted on.
Now for the axle. You will need a large pair of circlip pliers. You can try needle nose pliers, but I hope they’re not your favorite ones because you will break them. Just go get a big set of the correct pliers. Remove the circlip and the thrust washer that’s under it. Now grab the axle and pull it out. With your fingers, remove the two fulcrum plates. You can try and take out the side gear at this point but most of the time it won’t come out due to a ridge that has mushroomed out from the circlip. At some point you will want to grind or file that ridge out so you can get the side gear out. Repeat all this on the other side.
Now, clean up the floor because I know you made a mess and the wife is complaining about the smell of old 90w oil all over everything. Once you have made the wife happy we can start by putting this back together. Remember, happy wife happy life.
First, clean all the parts you have taken off. Inspect axles, especially the spade ends. Scratches are not that big of a deal, but the spade end needs to be flat from one end to the other. Everything but a bus usually doesn’t have any problems here. Clean your axle tube and remove the boots. Inspect all your bearings. Inspect your side gear for cracks. Take a close look at the fulcrum plates. Clean the bearing cap and install new seals in them. Lay things out so this will be easier to put together and you’re not searching for parts. By now you should have gone to the parts store and picked up a trans gasket set, two axle seal kits, two reduction box gaskets for your year boxes if you’re working on reduction boxes, oil and some sealer. One more suggestion here that you might want to think about are axle tube retainer plates. I will explain more later. So read on to see if you want to buy these.
Now, turn your trans so one of the side cover is straight up. We will be building this side all the way out before starting on the other side. We’re going to shim the axle tube here first. What? Shim? What the hell? I don’t see any stinking shims. Look in your gasket kit, there are eight or so gaskets for the axle tube. Yeah those are the shims. Before we get started I want you to grab your axle tube and put it on the bench with the casting down the tube up. Now pick up the retainer. That is the part that holds the tube to the side plate. Put a straight edge between the bolt holes. Do you see a gap? I bet you do. 90% of them do. This is why they leak. The metal is thin and it pulls up around the bolt holes. You can try and make them flat again, lord knows I’ve tried, or you can buy the axle tube retainer plate kit. What it is is thick plates that fit on the outside and when you bolt them down, flatten out the thin retainer plate and keep that plate from warping. To install these you will have to replace the six studs on each side with longer ones that come in the kit. This is up to you. I have had great luck with these kits and it really cuts down on the leaking issues. Ok back to the shimming. Place your clean plastic flower onto the side plate and snap it in. Now take three gaskets; that’s right three, and place them over the studs. Put your axle tub on with the washers and the nuts. Torque the nuts to 15ft lbs. Now grab ahold of the tube and rotate it around. You should have a slight drag on it. If you pull on the tube and it tries to move the trans is too tight and you will need to add a gasket. If it’s loose try and pull up on the tube, if you feel any movement at all up then take a gasket out and try again. You might have to reinstall the tube a few times to get this right. Again you only want a slight drag on it. Once you have determined the correct amount of gaskets (shims) then take it apart and set the gaskets off to the side knowing that, that is what we are going to use when putting it together for the final time. Remove the flower again.
Now clear a spot on the bench and grab your axle, fulcrum plates and side gear. Slide the fulcrums into the side gear dry. They are going to want to fall down. Not to worry, you can stick your finger in the hole of the back side and spread them out where they’re supposed to be as you put the axle spade end in. While holding it up, grab your feeler gauges and slide a gauge in between the spade end and the fulcrum plate. If the clearance here is between .001 and .010 you are good to go. If not start trying different fulcrum plates. Once you are good to go, take it apart and use white grease on the back sides fulcrums plates. Then grease the spade end of the axle and put it back together. I use some white grease on the outside of the side gear and get it ready to install in the diff. Now walk over to the trans and make sure the two spider gears are pushed out to the sides. Put the side gear with the axle into that side of the diff. You kind of have to do this in one motion pushing down. Rotate the axle to mesh the gears of the side gear to the spider gears. Once meshed you should see the correct distance to the thrust washer and snap ring.
Look down at the fulcrum plates and make sure one of them did not slip behind the spade end. At this point you can let go the axle and gravity will keep the fulcrum plates in place. Whatever you do, do not pull up on the axle. If you do, you will need to take everything back out and reset the fulcrum plates. This is why an engine stand is the way to go. Grab your snap ring and thrust washer. I either use white grease on the thrust washer or some oil. With the large snap ring pliers you bought, reinstall the snap ring making sure it's all the way in the groove. Next, grab your plastic flower and snap it into place, then use sealer. I use a product called Gasgacinch, and coat the gaskets (shims) and install onto to the side plate. Then I smear a light coat of oil on the bell of the axle tube. This prevents galling of the tube retainer. Put your tube over the axle and line up the retainer on the studs. Put your retainer plates on if you’re going to use them and install your washers then your nuts and torque to 15ft lbs.
Now, let's work our way out to the end before doing the other side. This will prevent the fulcrums from slipping behind the axle. Put the small spacer over the axle with the bevel towards the trans and flat side towards the bearing. Then install the bearing. The bearing is a tight fit and will need to be driven in place if you have non reduction boxes. If this is non reduction box then install you backing plate and bearing cap. I have written an article already on how you install those seals so I will refer you back to that. Install the cap and torque the cap. Now, you’re ready to do the other side.
On reduction boxes there is a lot more to do. So here you go. Put your tube over the axle like I explained earlier. Now the bearing and spacer are already in the tube unless you took out the lower axle. Then install your upper gear and upper outer bearing. Ok did that, how do I get the clip back on the upper axle? It’s not up far enough out of the bearing to get the clip back on. Look in the end of the axle, you will see that it’s threaded. I use a large spacer (swing axle outer spacer), thick flat washer (bus front end washer) and a 10mm bolt and rig up a puller to pull the axle through the bearing. By doing this you can get the clip back on. From here you can finish putting the box back together or now go to the other side.
That’s about it. If you used the retainer kit you are less likely by far to have a leak. Some other notes here: Once you are done tighten your axle nuts to 250flbs don’t install the cotter pins yet. Drive the car around the block. Retighten the nut. If it moved then drive it around the block again and torque again. Do this until the nut stops moving. Then look and see if the hole lines up to put the cotter pin in. If it does bingo. If it doesn’t tighten the nut so it does. Never ever back the nut off to line up the hole. I don’t care if you used an impact, just do it. I sell more brake drums because of stripped splines then I do because they are worn out diameter wise. Regarding axle boots, I install them on the trans before I put the trans back in. If you are using a boot that bolts together don’t put the seam straight up. Point it at a 45 degree angle up. This keeps the seam of the boot from getting worked as the tube goes up and down ripping the boot. Put the big clamp on and tighten it. Leave the small clamp loose until you have the trans in the car. Then tighten it after you have the tube bolted to the spring plate. That way when you rotate the tube to fit, you won’t be wrapping up the boot. With that said, whenever I have axle tubes off I use the seamless boots. Installing them is for another article. Last thing here, don’t forget to fill the trans and reduction boxes if you have them.


